DESCRIÇÃO EM PORTUGUÊS BREVEMENTE DISPONÍVEL
Se tiver alguma dúvida neste produto não hesite em contactar-nos.
*Atenção: as imagens são meramente ilustrativas.
For the best headphone listening experience, the VS1053 includes EarSpeaker spatial processing which accurately simulates how a room with stereo loudspeakers would sound. In addition to being able to decode all major formats, VS1053 is capable of recording in Ogg Vobis file. With a software patch, it’ll even play lossless FLAC audio as well.
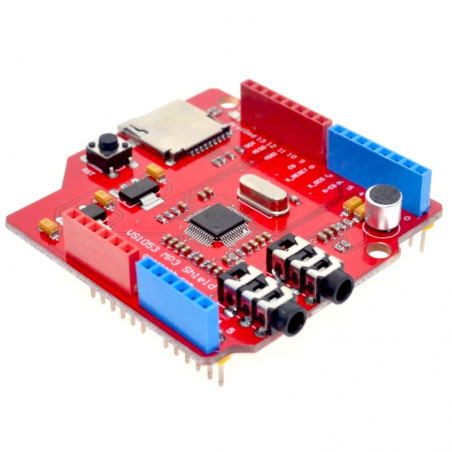
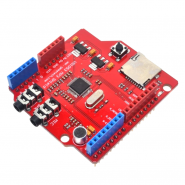
The VS1053 shield board is even better – it combines MicroSD card storage (up to 32GB) and also takes advantage of the VS1053’s audio recording capabilities (16-bit WAV/PCM or Ogg Vorbis via patch) through a built-in microphone or your own via the 3.5mm mic input. Delving into the specs further shows the chip can drive a standard 32-ohm headphone load. Total harmonic distortion (THD) is a reasonable 0.05% at that load and signal-to-noise ratio (SNR) at full-scale is 94dB – not earth-shattering, but still very respectable.
With the TF card slot on the other side of the board, you can play mp3 files from TF card using this breakout. It is easily to drop it in your project or make a mp3 player using your Arduino or other microcontroller. Features Can play a variety of music formats, support for OGG encoding real-time recording SPI interface, the control signal lines are led out A headphone and stereo output A microphone for recording A line_in input interface Power indicator 3.3V and 2.8V of LDO chip AMS-1117 on board, provides up to 800mA current A single power supply: +5 VDC 12.288 Mhz crystal TF cart slot.
How it works
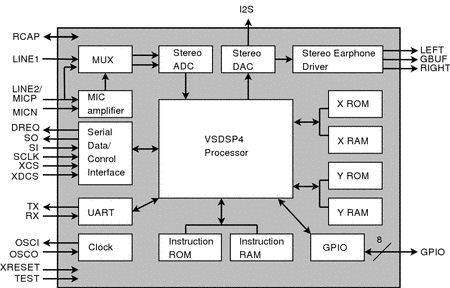
Look at the block diagram and the heart of the VS1053 is a DSP – digital signal processor – with its own RAM, control inputs, stereo analog-to-digital converter (ADC) for recording, stereo digital-to-analog converter (DAC) for playback and built-in headphone driver.
All we need is to write code that gets our Arduino board to act as traffic controller and transfer audio data from the MicroSD card to the VS1053 chip and playing out through the headphone socket (the outer of the two).
However, there is one drawback with that headphone socket – and it’s a bit technical – so the short version is the chip’s output has a DC offset, which means you can’t plug it straight into an audio amplifier. If you do, the VS1053 chip will likely blow up. However, the solution is to use a number of DC-blocking capacitors. The addendum PDF shows you the circuit required.Otherwise, we recommend you stick to headphones only and power it with a USB battery power pack (for safety, don’t use a USB wall charger). Power draw is about 80mA, so you should get a genuine full day’s playback from a 2200mAh USB power pack.
Features:
- Can play a variety of music formats, support for OGG encoding real-time recording
- SPI interface, the control signal lines are led out
- A headphone and stereo output
- A microphone for recording
- A line_in input interface
- Power indicator
- 3.3V and 2.8V of LDO chip AMS-1117 on board, provides up to 800mA current
- A single power supply: +5 VDC
- 12.288 Mhz crystal
- TF card slot
Decodes formats
- Ogg Vorbis
- MP3 = MPEG 1 & 2 audio layer III (CBR+VBR+ABR)
- MP1 & MP2 = MPEG 1 & 2 audio layers I & II optional
- MPEG4 / 2 AAC-LC(+PNS), HE-AAC v2 (Level 3) (SBR + PS)
- WMA4.0/4.1/7/8/9 all profiles (5-384 kbps)
- FLAC lossless audio with software plugin (upto 24 bits, 48 kHz)
- WAV (PCM + IMA ADPCM)
- General MIDI 1 / SP-MIDI format 0
Encodes formats from mic/line
- Ogg Vorbis with software plugin
- IMA ADPCM
- 16-bit PCM
VS1053 IC
VS1053 is a versatile "MP3 decoder chip" belonging to VLSI Solution's extensive slave audio processor family. In addition to being able to decode all the most common audio formats - including the advanced features of newer AAC files - functionality of this IC can be greatly expanded just by loading a bit of extra software to its RAM memory. In addition to being able to decode all major audio formats, VS1053 is capable of recording in three different audio formats, from lossless 16-bit PCM to highly compressed, yet high-quality Ogg Vorbis files. For the best headphone listening experience the VS1053 includes EarSpeaker spatial processing which accurately simulates how a room with stereo loudspeakers would sound. This option can naturally be turned off when required. All in all, VS1053 is an easy-to-use, powerful workhorse for audio playback and recording applications.
Features:
Decodes multiple formats
- Ogg Vorbis
- MP3 = MPEG 1 & 2 audio layer III (CBR+VBR+ABR)
- MP1 & MP2 = MPEG 1 & 2 audio layers I & II optional
- MPEG4 / 2 AAC-LC(+PNS), HE-AAC v2 (Level 3) (SBR + PS)
- WMA4.0/4.1/7/8/9 all profiles (5-384 kbps)
- FLAC lossless audio with software plugin (up to 24 bits, 48 kHz)
- WAV (PCM + IMA ADPCM)
- General MIDI 1 / SP-MIDI format 0
Encodes three different formats from mic/line in mono or stereo
- Ogg Vorbis with software plugin
- IMA ADPCM
- 16-bit PCM
- Streaming support
- EarSpeaker Spatial Processing
- Bass and treble controls
- Operates with a single 12-13 MHz or 24-26 MHz clock
- Internal PLL clock multiplier
- Low-power operation
- High-quality on-chip stereo DAC with no phase error between channels
- Zero-cross detection for smooth volume change
- Stereo earphone driver capable of driving a 30 ohm load
- Quiet power-on and power-off
- I2S interface for external DAC
- Separate voltages for analog, digital, I/O
- 16.5 KiB on-chip RAM for user code and data
- Serial control and data interfaces
- Can be used as a slave co-processor
- SPI flash boot for special applications
- UART for debugging purposes
- New functions may be added with software and up to 8 GPIO pins
- VS1053B-L chip has MP3 Decoder, Ogg Vorbis Enc. (plugin), Ogg Vorbis Dec., HE-AAC Dec., WMA Dec., Flac Dec. (plugin), MIDI Dec.
You can read the specification of VS1053b here.
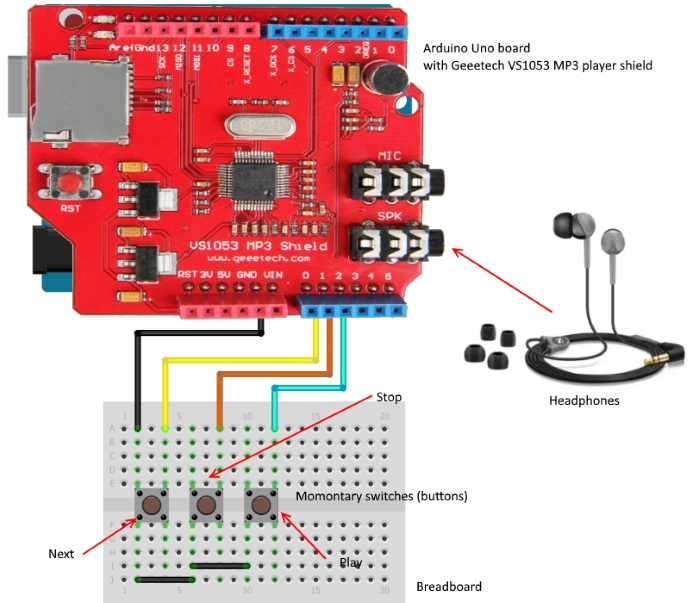
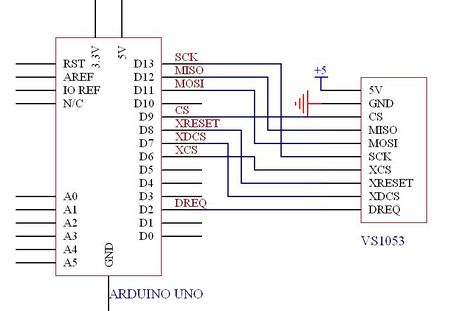
Wiring
Step by Step instruction
-
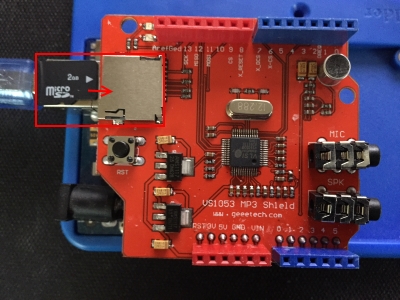
You can use Micro SD card(<=2G) or Mirco SDHC card (<=32G) with this module.
Most SD cards work right out of the box, but it's possible you have one that was used in a computer or camera and it cannot be read by the SD library. Formatting the card will create a file system that the Arduino can read and write to. It's not desirable to format SD cards frequently, as it shortens their life span. You’ll need a SD card reader or micro SD card adapter and computer to format your card. The library supports the FAT16 and FAT32 filesystems, but use FAT16 when possible. See additional info here.
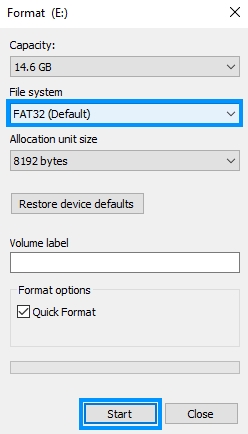
Format the SD card as FAT16 or FAT32. Insert the SD card in your computer. Go to My Computer and right click on the SD card.
You can use Micro SD card with this module only.
- Most SD cards work right out of the box, but it's possible you have one that was used in a computer or camera and it cannot be read by the SD library. Formatting the card will create a file system that the Arduino can read and write to. It's not desirable to format SD cards frequently, as it shortens their life span. You’ll need a SD card reader or micro SD card adapter and computer to format your card. The library supports the FAT16 and FAT32 filesystems, but use FAT16 when possible. See additional info here.Format the SD card as FAT16 or FAT32. Insert the SD card in your computer. Go to My Computer and right click on the SD card.
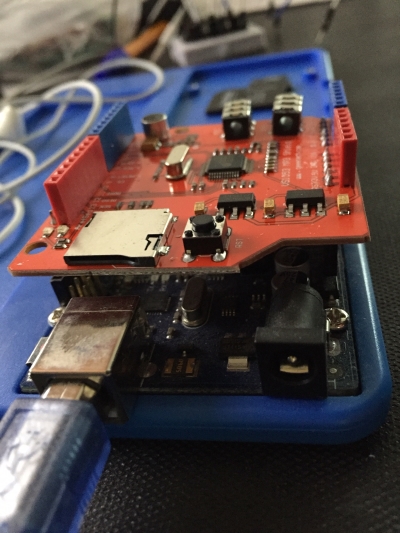
- Insert Geeetech VS1053 MP3 player shield into Arduino Uno board.
- Format the SD card as FAT16 or FAT32. Insert the SD card in your computer. Go to My Computer and right click on the SD card. Select Format...
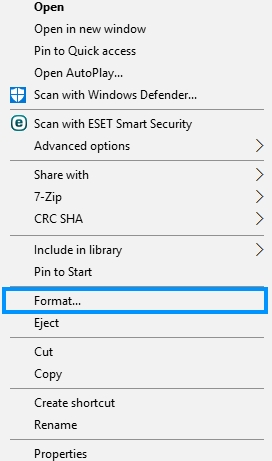
- A new window pops up. Select FAT32, press Start to initialize the formatting process and follow the onscreen instructions.
- Copy music files to the micro SD card. MP3 files must be with the filename like "track000.mp3", "track001.mp3" and etc.
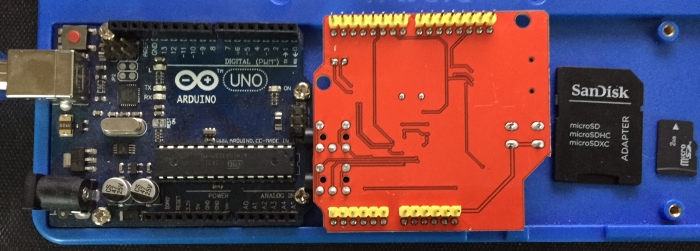
- Insert the TF card which stores your mp3 files into the TF card slot of Geeetech VS1053 MP3 player shield.
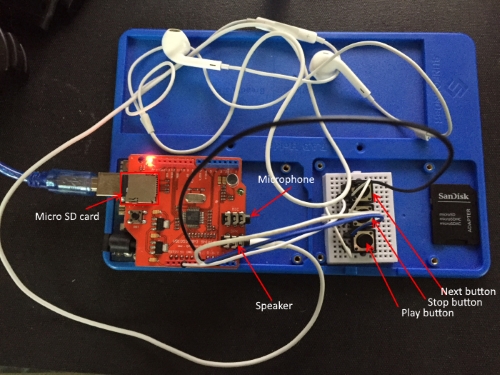
- Do wiring.
- Open Arduino IDE.
- Plug your Adruino Uno board into your PC and select the correct board and com port
- Verify and upload the sketch to your Adruino Uno.
- Open Serial monitor with 115200 baudrate.
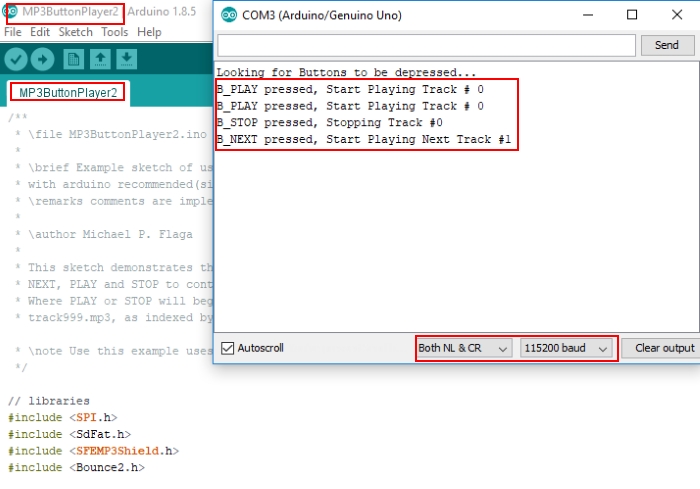
- If you use MP3buttonplayer2sketch - control your songs with Play,Stop,Next buttons. When any of these buttons pressed you will get the message in Serial Monitor.
- If you use FilePlayersketch then enter your command in Serial monitor. You will see the list of commands in Serial monitor. Input the number 'x' will play the corresponding mp3 file "track00x.mp3" in your TF card.
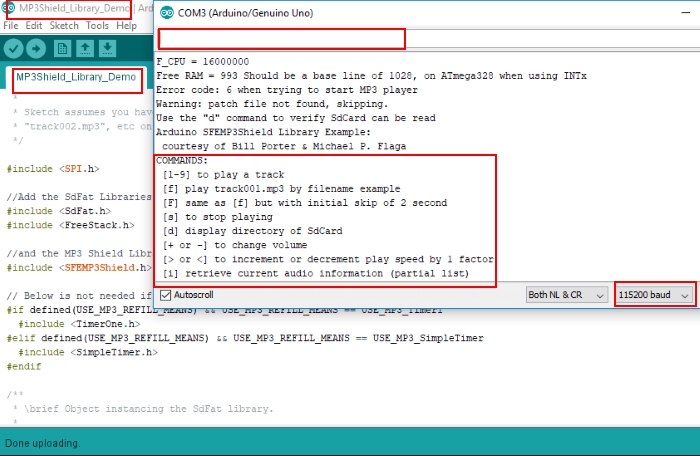
- If you use MP3Shield_Library_Demosketch Open the serial monitor with the baudrate 115200, input the number 'x' will play the corresponding mp3 file "track00x.mp3" in your TF card.

Summary
We learnt how to connect Geeetech VS1053 MP3 player shield to Arduino board and use it.
Library
- All libraries attached on the begining of the project description
- SdFat library. Download, unzip and add to libraries in our PC, for example C:\Users\toshiba\Documents\Arduino\libraries. This link you can find in Preferences of Adruino IDE program which installed in your PC. You can read about it here. The SdFat library takes care of initialising the link between the Arduino microcontroller chip and the MicroSD card, setting its speed (4MHz). The library only supports FAT filesystem, so make sure you format the MicroSD card to FAT32 before using it here.
- SFEMP3Shield library. Download, unzip and add to libraries in our PC, for example C:\Users\toshiba\Documents\Arduino\libraries. This link you can find in Preferences of Adruino IDE program which installed in your PC. You can read about it here.
- The SFEMP3Shield library handles most of the goodies inside the VS1053 chip. By the look of it, it doesn’t do everything (recording, for instance, seems to be missing), but there are still plenty of toys to play with, including support for VU meters, graphic equalisation, even changing the speed of playback. Much like the Arduino’s ATMEGA328P microcontroller chip, the VS1053 is programmed using a series of registers, each housing a number of controls or ‘bits’ that can either be read from or written to, controlling the various functions inside. The SFEMP3Shield library provides us with the shortcuts to coding those individual register bits, allowing us to use more recognisable ‘plain-English’ statements in our Arduino code.
- SPI library included in Arduino IDE.
- Bounce2 library. Download, unzip and add to libraries in our PC, for example C:\Users\toshiba\Documents\Arduino\libraries. This link you can find in Preferences of Adruino IDE program which installed in your PC. You can read about it here.