

Impressora térmica com comunicação série TTL para Arduino - Tutoriais, Códigos de exemplo e vídeo disponíveis!!!
Se tiver alguma dúvida neste produto não hesite em contactar-nos.
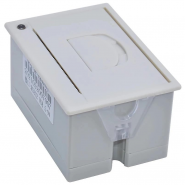
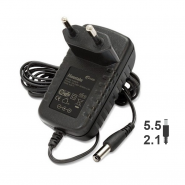
*Atenção: as imagens são meramente ilustrativas.
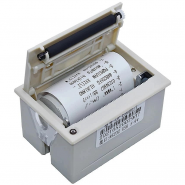
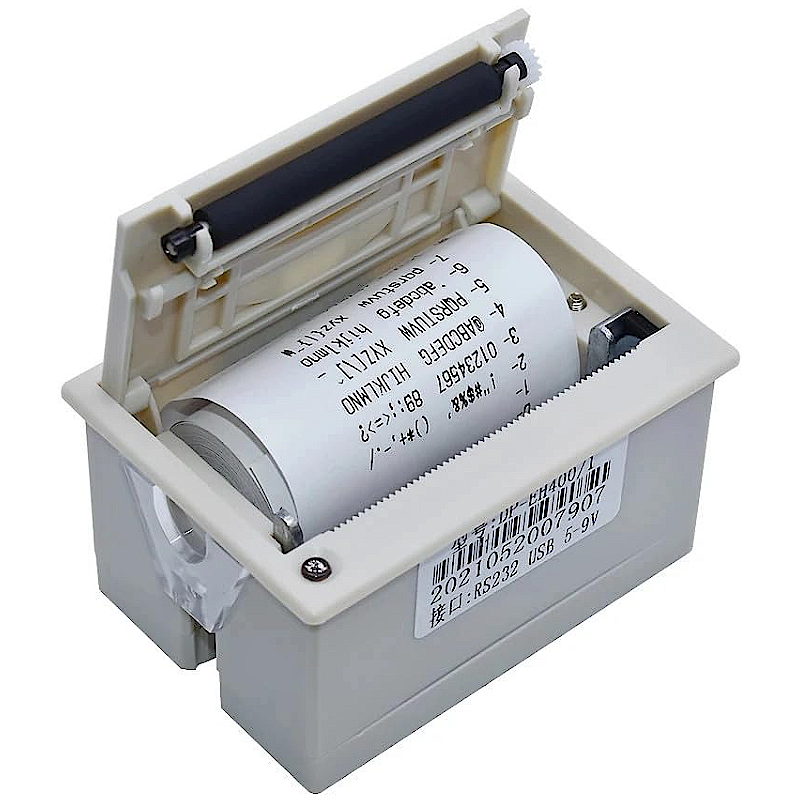
The embedded thermal printer uses thermal technology, it doesn't need to add toner or ink, stable performance and mini size. The embedded thermal printers are widely used in instrumentation, food inspection, shopping terminals and other scenarios. It can be found in the ATM machines, lockers, POS and supermarket electronic scales in the life. The printer uses a 5~9V wide voltage supply mode. The higher the voltage, the clearer the printing effect. It is suitable for thermal paper rolls with a width of 58MM and able to provide a print life of 50 kilometers. It supports Arduino, Raspberry Pi, and Windows System. We can refer to the instruction set and use the USB serial port or TTL communication interface to send corresponding commands to the thermal printer. Then the printer will instantly print out the text, characters, barcode, QR code and even black and white pictures according to the instructions; we can connect it to the Arduino controller or the Raspberry Pi by a serial port. Combining with various sensors, we can DIY all kinds of practical instruments such as electronic scale, blood pressure index measuring instrument, soil element analyzer and driving recorder. Besides, we can also make a small ticket printer of our own. The content on the small ticket can be defined by ourselves. After further development, we can even realize the remote printing function.
 NOTE:
NOTE:

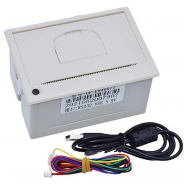
TTL Communication Interface
| Number | Name | Description |
|---|---|---|
| 1 | GND | Ground |
| 2 | DTR | Flow Control |
| 3 | RXD | Receive Data |
| 4 | TXD | Transmit Data |
| 5 | NC | Not Connected |
Power Interface
| Number | Name | Description |
|---|---|---|
| 1 | VCC | 5-9V |
| 2 | GND | Ground |

 )
)
#include <SoftwareSerial.h>
#define TX_PIN 6                             // Arduino transmit  YELLOW WIRE  labeled RX on printer
#define RX_PIN 5                             // Arduino receive   GREEN WIRE   labeled TX on printer
SoftwareSerial mySerial(RX_PIN, TX_PIN, 1);  //Invert Logic Signals

void setup() {
// put your setup code here, to run once:
Serial.begin(57600);
mySerial.begin(9600);
}

void loop()
{
// put your main code here, to run repeatedly:
mySerial.println("BotnRoll.com");
mySerial.println("111111111111111111111111111111");
mySerial.println("222222222222222222222222222222");
mySerial.println("-0123456789ABCDEFGHIJKLMNOPQRS");
mySerial.println();
while (1);
}
1.Create a hz.c file, the content should be a created character array. (How to create a .c file? Create a .txt file and revise the suffix to .c)
const char hz[][32] is a statement of a character string array in fact. One string cannot exceed 32 bytes (16-bit Chinese character coded in GB2312). If you want to display a long Chinese character, you need to revise the number “32”; actually, in other words, it means to take out all Chinese characters and put them into a array. An international program version can be easily realized by this way since we can display different language by just switching the array;
Note : The creation of this file aims to solve the problem that GB2312 Chinese character internal code cannot be edited under IDE Programming Environment. So don’t open the file in IDE programming environment in case the file is rewritten into UTF8 internal code file.
# const char hz[][32]={
"DFROBOT",             //0
"极趣科技",             //1
"嵌入式热敏打印机",     //2
"arduino开发控制",     //3
"DIY趣味",             //4
"让我们一起共创未来",     //5
"打造我们的DIY世界",     //6
};
2.Compose Program
#include"C:\Users\Administrator\Documents\Arduino\uart_dayinji\hz.c" //Reference the hz.c file created before, the content of the quotation should be the index address of the hz.c file, and it need to be revised according to hz.c actual address.#define TX_PIN 6 // Arduino transmit YELLOW WIRE labeled RX on printer
#define RX_PIN 5 // Arduino receive GREEN WIRE labeled TX on printer
SoftwareSerial mySerial(RX_PIN, TX_PIN, 1); //Invert Logic Signalsvoid setup() { mySerial.begin(9600); } void loop() { mySerial.println(); mySerial.println(); mySerial.println("DFROBOT"); mySerial.println(); mySerial.println(hz[0]); mySerial.println(hz[1]); mySerial.println(hz[2]); mySerial.println(hz[3]); mySerial.println(hz[4]); mySerial.println(hz[5]); mySerial.println(hz[6]); mySerial.println(); mySerial.println(); mySerial.println(); delay(10000); }
3.The following characters will be displayed on the thermal ticket roll.
DFROBOT
极趣科技
嵌入式热敏打印机
arduino开发控制
DIY趣味
让我们一起共创未来
打造我们的DIY世界`Write the print instructions of QR code and barcode in accordance with the reference of General Instruction Set and Special Instruction Set.
#include <SoftwareSerial.h>#define TX_PIN 11#define RX_PIN 10SoftwareSerial mySerial(RX_PIN,TX_PIN, 1); //Invert Logic Signals/*--------Print barcode instruction, including information “DFR0503”---------*/ char bar_code[24]={ 0x1b, 0x40, 0x1d, 0x48, 0x02, //the 43rd command of the general instruction, select the print address of the information (HRI character)included in the barcode.0×02 means that the printed information should be below the barcode. 0x1d, 0x68, 0x64, //set barcode height, range”1~255”, here we set it to “0×64” . 0x1d, 0x77, 0x03, //the 45th command of the general instruction, set horizontal width, here we select “0×03”. 0x1d, 0x6b, 0x49, 0x09, 0x7B, 0x42, 0x44, 0x46, 0x52, 0x7B, 0x43, 0x05, 0x03 //set the information included in barcode. Barcode length “0×09” correspond to ”DFR0503”. “0×44, 0×46, 0×52” are ACILL codes of the three letter D,F,R respectively. “0×05, 0×03” is “0503”. }; //if the information is “DFR050308”, the barcode length should be”0×0B”, and so on. /*--------Print QR code instruction, including information”www.dfrobot.com”---------*/ const char QRx[60]={ 0x1b,0x40, 0x1d,0x28,0x6b,0x03,0x00,0x31,0x43,0x05, //Refer to the 1st command of special instruction set.QR code size “0×05” 0x1d,0x28,0x6b,0x03,0x00,0x31,0x45,0x30, //Set QR code verification level to L. 0x1d,0x28,0x6b,0x12,0x00,0x31,0x50,0x30,0x77,0x77,0x77,0x2E,0x64,0x66,0x72,0x6F,0x62,0x6F,0x74,0x2E,0x63,0x6F,0x6D, //“0x12” is the number of the character(15) of the information”www.dfrobot.com” that was included in QR code plus 3. //“0x77,0x77,0x77,0x2E,0x64,0x66,0x72,0x6F,0x62,0x6F,0x74,0x2E,0x63,0x6F,0x6D” are the ACILL code of the characters of the website address. 0x1b,0x61,0x01, //centre the graphic 0x1d,0x28,0x6b,0x03,0x00,0x31,0x52,0x30, //Verify the QR code 0x1d,0x28,0x6b,0x03,0x00,0x31,0x51,0x30 //print the QR code }; void setup(){ mySerial.begin(9600); Serial.begin(9600); while(Serial.read()>= 0){} } void loop(){ mySerial.println(); mySerial.print("---------------------------------"); mySerial.println(); mySerial.write(bar_code,60); //send “print barcode instruction” to printer delay(5); mySerial.println(); mySerial.write(QRx,60); //send “print QR code instruction” to printer. mySerial.println(); mySerial.print("---------------------------------"); delay(5000); }
Refer to the 35th command of the official general instruction set “ define the download bitmap mode”
1.Use software PCtoLCD2002 to abstract character matrix from a bitmap. (the size of the bitmap should be: x<2558,y<488; it would be better if the bitmap size is the multiple of 8; set negative code, one by one, straightforward );
2.Create an ”imege.h”file, paste the abstracted hexadecimal array into it, and then you will get a bitmap character matrix library.
#unsigned char  show[] = {
0x1B,0x2A,0x20,0xFA,0x00,   //Bitmap size: 24*250, revise parameter with the reference of general instruction set 34 and 35.
0x00,0x00,0x00,0x00,0x00,0x00,0x00,0x00,0x00,0x00,0x00,0x00,0x00,0x00,0x00,0x00,0x00,0x00,0x00,0x00,0x00,0x00,0x00,0x00,0x00,0x00,0x00,0x00,
0x00,0x00,0x00,0x00,0x00,0x00,0x00,0x00,0x00,0x00,0x00,0x00,0x00,0x00,0x00,0x00,0x00,0x00,0x38,0x00,0x00,0xFE,0x00,0x00,0xFE,0x00,0x01,0xFF,
0x00,0x01,0xFF,0x80,0x03,0xFF,0x80,0x03,0xEF,0x80,0x07,0xEF,0xC0,0x07,0xC7,0xC0,0x07,0xC7,0xC0,0x07,0xC7,0xC0,0x07,0xC7,0xE0,0x0F,0x83,0xE0,
0x0F,0x83,0xE0,0x0F,0x83,0xE0,0x0F,0x83,0xE0,0x0F,0x83,0xE0,0x0F,0x83,0xE0,0x0F,0x81,0xF0,0x1F,0x01,0xF0,0x1F,0x01,0xF0,0x1F,0x01,0xF0,0x1F,
0x01,0xF0,0x1F,0x01,0xF0,0x1F,0x01,0xF0,0x1F,0x01,0xF0,0x1F,0x01,0xF0,0x1F,0x01,0xF0,0x1F,0x01,0xF0,0x1F,0x01,0xF0,0x1F,0x01,0xF0,0x1F,0x01,
0xF0,0x1F,0x01,0xF0,0x1F,0x01,0xF0,0x1F,0x01,0xF0,0x1F,0x01,0xF0,0x1F,0x01,0xF0,0x1F,0x01,0xF0,0x1F,0x01,0xF0,0x0F,0x81,0xF0,0x0F,0x83,0xE0,
0x0F,0x83,0xE0,0x0F,0x83,0xE0,0x0F,0x83,0xE0,0x0F,0x83,0xE0,0x0F,0x83,0xE0,0x0F,0xC7,0xE0,0x07,0xC7,0xC0,0x07,0xC7,0xC0,0x07,0xC7,0xC0,0x07,
0xEF,0xC0,0x03,0xEF,0x80,0x03,0xFF,0x80,0x01,0xFF,0x80,0x01,0xFF,0x00,0x00,0xFE,0x00,0x00,0xFE,0x00,0x00,0x38,0x00,0x00,0x00,0x00,0x00,0x00,
0x00,0x00,0x00,0x00,0x00,0x00,0x00,0x00,0x00,0x00,0x00,0x00,0x00,0x00,0x00,0x00,0x00,0x00,0x00,0x00,0x00,0x00,0x00,0x00,0x00,0x00,0x00,0x00,
0x01,0xFF,0x80,0x03,0xFF,0xC0,0x03,0xFF,0xC0,0x03,0xFF,0xC0,0x03,0xFF,0xC0,0x03,0xE7,0xC0,0x03,0xE7,0xC0,0x03,0xE7,0xC0,0x03,0xE7,0xC0,0x03,
0xE7,0xC0,0x03,0xE7,0xC0,0x03,0xE7,0xC0,0x03,0xE7,0xC0,0x03,0xE7,0xC0,0x03,0xE7,0xC0,0x03,0xE7,0xC0,0x03,0xE7,0xC0,0x03,0xE7,0xC0,0x03,0xE7,
0xC0,0x03,0xE7,0xC0,0x03,0xE7,0xC0,0x03,0xE7,0xC0,0x03,0xE7,0xC0,0x03,0xE7,0xC0,0x03,0xE7,0xC0,0x03,0xE7,0xC0,0x03,0xE7,0xC0,0x0F,0xE7,0xF0,
0x1F,0xE7,0xF8,0x1F,0xE7,0xF8,0x1F,0xE7,0xF8,0x1F,0xC3,0xF8,0x0F,0x81,0xF0,0x0F,0x81,0xF0,0x0F,0x81,0xF0,0x0F,0xC1,0xF0,0x07,0xC3,0xE0,0x07,
0xC3,0xE0,0x07,0xC3,0xE0,0x07,0xC3,0xE0,0x03,0xE7,0xC0,0x03,0xE7,0xC0,0x03,0xE7,0xC0,0x03,0xE7,0xC0,0x01,0xFF,0x80,0x01,0xFF,0x80,0x01,0xFF,
0x80,0x01,0xFF,0x80,0x00,0xFF,0x80,0x00,0xFF,0x00,0x00,0xFF,0x00,0x00,0xFF,0x00,0x00,0x7F,0x00,0x00,0x7E,0x00,0x00,0x7E,0x00,0x00,0x7E,0x00,
0x00,0x7E,0x00,0x00,0x3C,0x00,0x00,0x1C,0x00,0x00,0x00,0x00,0x00,0x00,0x00,0x00,0x00,0x00,0x00,0x00,0x00,0x00,0x00,0x00,0x00,0x00,0x00,0x00,
0x00,0x00,0x00,0x00,0x00,0x00,0x00,0x00,0x00,0x00,0x00,0x00,0x00,0x00,0x00,0x00,0x00,0x00,0x00,0x00,0x00,0x00,0x00,0x00,0x00,0x00,0x00,0x00,
0x00,0x00,0x00,0x00,0x00,0x00,0x00,0x00,0x00,0x00,0x00,0x00,0x00,0x01,0xFF,0x80,0x03,0xFF,0xC0,0x07,0xFF,0xC0,0x07,0xFF,0xE0,0x07,0xFF,0xE0,
0x07,0xC3,0xE0,0x0F,0x83,0xE0,0x0F,0x83,0xE0,0x0F,0x83,0xE0,0x0F,0x83,0xE0,0x0F,0x81,0xF0,0x0F,0x81,0xF0,0x0F,0x81,0xF0,0x0F,0x81,0xF0,0x0F,
0x81,0xF0,0x0F,0x81,0xF0,0x0F,0x81,0xF8,0x0F,0x80,0xF8,0x0F,0x80,0xF8,0x0F,0x80,0xF8,0x0F,0x80,0xF8,0x0F,0x81,0xF8,0x0F,0x81,0xF0,0x0F,0x81,
0xF0,0x0F,0x81,0xF0,0x0F,0x81,0xF0,0x0F,0x81,0xF0,0x0F,0x81,0xF0,0x0F,0x81,0xF0,0x0F,0x81,0xF0,0x0F,0x81,0xF0,0x0F,0x81,0xF0,0x0F,0x81,0xF0,
0x0F,0x81,0xF0,0x0F,0x81,0xF0,0x0F,0x81,0xF0,0x0F,0x81,0xF0,0x0F,0x81,0xF0,0x0F,0x81,0xF0,0x0F,0x81,0xF0,0x0F,0x81,0xF0,0x0F,0x81,0xF0,0x0F,
0x81,0xF0,0x0F,0x81,0xF0,0x0F,0x81,0xF0,0x0F,0x81,0xF0,0x0F,0x81,0xF0,0x0F,0x81,0xF0,0x0F,0x81,0xF0,0x0F,0x81,0xF0,0x0F,0x81,0xF0,0x0F,0x81,
0xF0,0x0F,0x81,0xF0,0x0F,0x81,0xF0,0x0F,0x81,0xE0,0x0F,0x83,0xE0,0x0F,0x83,0xE0,0x0F,0x83,0xE0,0x07,0xC3,0xE0,0x07,0xFF,0xE0,0x07,0xFF,0xE0,
0x07,0xFF,0xC0,0x03,0xFF,0xC0,0x01,0xFF,0x80,0x00,0x00,0x00,0x00,0x00,0x00,0x00,0x00,0x00,0x00,0x00,0x00,0x00,0x00,0x00,0x00,0x00,0x00,0x00,
0x00,0x00,0x00,0x00,0x00,0x00,0x00,0x00,0x00,0x00,0x00,0x00,0x00,0x00,0x00,0x00,0x00,0x00,0x00,0x00,0x00,0x00,0x00,0x00,0x00,0x00,0x00,0x00,
0x00,0x00,0x00,0x00,0x00,0x00,0x00,0x00,0x00,0x00,0x00,0x00,0x00,0x00,0x00,0x00,0x00,0x00,0x00,0x00,0x00,0x00,0x0d,0x0a,
0x1B,0x40,
0x1b,0x2a,0x00,0x0C,0x00,0xFF,0xFF,0xFF,0xFF,0xFF,0xFF,0xFF,0xFF,0xFF,0xFF,0xFF,0xFF,                                                       //Print a division line
0x1B,0x33,0x00,
0x0A,
0x1D,0x2F,0x30                                                                                                                              //Print bitmap instruction

};
3.Compose program and send instruction
#include <SoftwareSerial.h> #include"D:\image.h" //Reference the created image.h file, and revise address according to the actual condition.#define TX_PIN 11#define RX_PIN 10SoftwareSerial mySerial(RX_PIN,TX_PIN, 1); //Invert Logic Signals/*--------Print barcode instruction, including "DFR0503"---------*/ char picture_S[6]={ 0x1b, 0x40, 0x1d, 0x2A, 0x14,0x0A //Refer to general instruction set 34 and 35, get 0×14 and 0×0A by calculating bitmap size. }; char picture_E[3]={ 0xID,0x2F,0x30 }; void setup(){ mySerial.begin(9600); Serial.begin(9600); while(Serial.read()>= 0){} } void loop(){ mySerial.println(); mySerial.print("---------------------------------"); mySerial.println(); mySerial.write(show,823); //Send “print bitmap instruction” to printer mySerial.println(); mySerial.print("---------------------------------"); delay(5000); }
Input "Mike" to Serial Port Assistant, after sending it to uno, the printer will print “Name: Mike”; when sending "1520000** ", it will be recognized as a telephone number, and the printer will print "Tel: 1520000** "; Input a words beginning as : "this is a test", it will be recognized as a remark, and the printer will print "Remarks:"
#include "SoftwareSerial.h" #include "Wire.h" char buffer[30];#define TX_PIN 11#define RX_PIN 10SoftwareSerial mySerial(RX_PIN,TX_PIN, 1); //Invert Logic SignalsString comdata = ""; char comdataX; int numdata; void setup() { mySerial.begin(9600); Serial.begin(9600); while(Serial.read()>= 0){} } void loop() { //Serial_pc(); Serial_pc1(); } void Serial_pc() { while(Serial.available()>0){ delay(100); mySerial.print("DFROBOT:"); numdata = Serial.readBytes(buffer,30); mySerial.print(buffer); } for(int i=0; i<30; i++) buffer[i]=0; } void Serial_pc1() { while(Serial.available()>0){ delay(100); numdata = Serial.readBytes(buffer,30); if(buffer[0]>'/'&&buffer[0]<':') { mySerial.print("Tel:"); mySerial.println(buffer); } else if(buffer[0]>'@'&&buffer[0]<'{') { mySerial.print("Name:"); mySerial.println(buffer); } else if(buffer[0]=='*') { mySerial.print("Remarks:"); mySerial.println(buffer); } else{;} } for(int i=0; i<30; i++) buffer[i]=0; }

Produtos Associados

Impressora térmica com comunicação série TTL para Arduino - Tutoriais, Códigos de exemplo e vídeo disponíveis!!!
