- DISCONTINUED


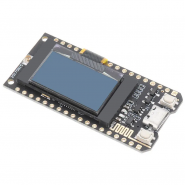
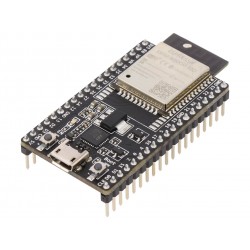
Small and powerful!
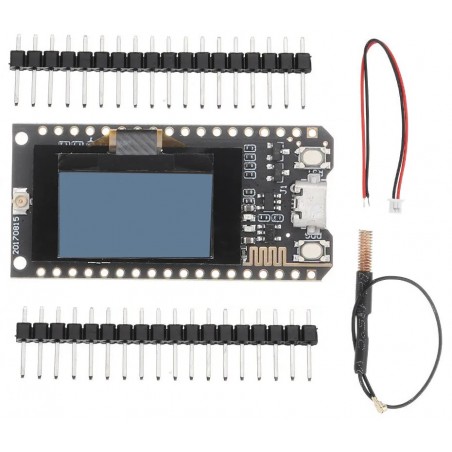
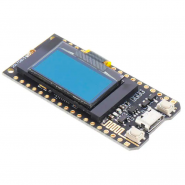
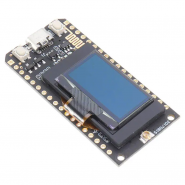
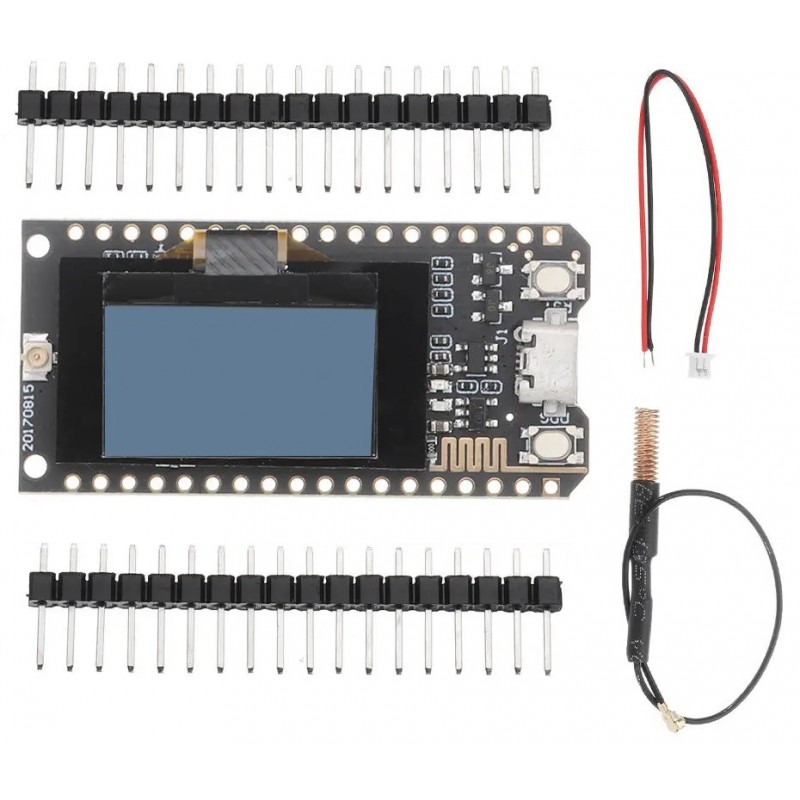
This product has SX1278 LoRa Communication chip and a ESP32 main processor. Also has a very usefull display to show sensors information that you could add to your project or some communication data.
Note: Battery not included. Only supplied with battery cable. You could find one battery here (Don't forget to confirm battery polarity befor connection!)
If you have any questions on this product please feel free to contact us.
*Disclaimer: The images are merely illustrative.
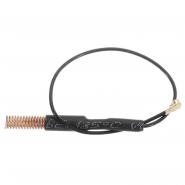
The 433MHz antenna must be used in conjunction with the IPEX interface (if the antenna is not connected, it may damage the LoRa chip)
Lithium battery charging and discharging circuit, when the battery is full, the blue LED will stop working. When using, pay attention to the positive and negative of the battery, otherwise it will be damaged.
Note:This product does not include the battery.
Using the IO port touch screen touch signal input, you need to add the 100nF pull-down capacitor at this pin!
Package included:
1 x ESP32 OLED
1 x Line
2 x pin
1 x 433m Spring Antenna
Operating voltage: 3.3V to 7V
Operating temperature range: -40 degrees C to +90 degrees C
Support for Sniffer, Station, softAP, and Wi-Fi Direct modes
Data rates: 150 Mbps@11n HT40, 72 Mbps@11n HT20, 54 Mbps@11g, 11 Mbps@11b
Transmit power: 19.5 dBm@11b, 16.5 dBm@11g, 15.5 dBm@11n
Receiver sensitivity up to -98 dBm
UDP sustained throughput of 135 Mbps

For more product information, click https://drive.google.com/file/d/1L8ll-DeAC2SATBZn0-KbSaZsrinbnXkF/view


Click links for more details: https://eyun.baidu.com/s/3hsiTNgg
#include
#include
#include
// GPIO5  -- SX1278's SCK
// GPIO19 -- SX1278's MISO
// GPIO27 -- SX1278's MOSI
// GPIO18 -- SX1278's CS
// GPIO14 -- SX1278's RESET
// GPIO26 -- SX1278's IRQ(Interrupt Request)

#define SS      18
#define RST     14
#define DI0     26
#define BAND    433E6
int counter = 0;

void setup() {
  pinMode(25,OUTPUT); //Send success, LED will bright 1 second

  Serial.begin(115200);
  while (!Serial); //If just the the basic function, must connect to a computer

  SPI.begin(5,19,27,18);
  LoRa.setPins(SS,RST,DI0);
//  Serial.println("LoRa Sender");

  if (!LoRa.begin(BAND)) {
    Serial.println("Starting LoRa failed!");
    while (1);
  }
  Serial.println("LoRa Initial OK!");
}

void loop() {
  Serial.print("Sending packet: ");
  Serial.println(counter);

  // send packet
  LoRa.beginPacket();
  LoRa.print("hello ");
  LoRa.print(counter);
  LoRa.endPacket();

  counter++;
  digitalWrite(25, HIGH);   // turn the LED on (HIGH is the voltage level)
  delay(1000);                       // wait for a second
  digitalWrite(25, LOW);    // turn the LED off by making the voltage LOW
  delay(1000);                       // wait for a second

  delay(3000);
}
Example Code (1) LoRaReceiver
#include
#include
// GPIO5  -- SX1278's SCK
// GPIO19 -- SX1278's MISO
// GPIO27 -- SX1278's MOSI
// GPIO18 -- SX1278's CS
// GPIO14 -- SX1278's RESET
// GPIO26 -- SX1278's IRQ(Interrupt Request)

#define SS      18
#define RST     14
#define DI0     26
#define BAND    433E6

void setup() {
  Serial.begin(115200);
  while (!Serial); //if just the the basic function, must connect to a computer
  delay(1000);

  Serial.println("LoRa Receiver");

  SPI.begin(5,19,27,18);
  LoRa.setPins(SS,RST,DI0);

  if (!LoRa.begin(BAND)) {
    Serial.println("Starting LoRa failed!");
    while (1);
  }
}

void loop() {
  // try to parse packet
  int packetSize = LoRa.parsePacket();
  if (packetSize) {
// received a packet
    Serial.print("Received packet '");

    // read packet
    while (LoRa.available()) {
      Serial.print((char)LoRa.read());
    }

    // print RSSI of packet
    Serial.print("' with RSSI ");
    Serial.println(LoRa.packetRssi());
  }
}
Example Code (2) LoRaReceiverCallback
#include
#include
// GPIO5  -- SX1278's SCK
// GPIO19 -- SX1278's MISO
// GPIO27 -- SX1278's MOSI
// GPIO18 -- SX1278's CS
// GPIO14 -- SX1278's RESET
// GPIO26 -- SX1278's IRQ(Interrupt Request)

#define SS      18
#define RST     14
#define DI0     26
#define BAND    433E6

void setup() {
  Serial.begin(115200);
  while (!Serial); //if just the the basic function, must connect to a computer

  SPI.begin(5,19,27,18);
  LoRa.setPins(SS,RST,DI0);

  Serial.println("LoRa Receiver Callback");

  if (!LoRa.begin(BAND)) {
    Serial.println("Starting LoRa failed!");
    while (1);
 }

  // register the receive callback
  LoRa.onReceive(onReceive);

  // put the radio into receive mode
  LoRa.receive();
}

void loop() {
  // do nothing
}

void onReceive(int packetSize) {
  // received a packet
  Serial.print("Received packet '");

  // read packet
  for (int i = 0; i < packetSize; i++) {
    Serial.print((char)LoRa.read());
  }

  // print RSSI of packet
  Serial.print("' with RSSI ");
  Serial.println(LoRa.packetRssi());
}
}

Related products
Small and powerful!
This product has SX1278 LoRa Communication chip and a ESP32 main processor. Also has a very usefull display to show sensors information that you could add to your project or some communication data.
Note: Battery not included. Only supplied with battery cable. You could find one battery here (Don't forget to confirm battery polarity befor connection!)
